Pages

Saturday, October 30, 2010

Banana Blueberry Pancakes


The first recipe I tried was the "Banana-Blueberry Pancakes" on page 516.  Where better to start than with breakfast?  The first thing I did was review the recipe to see what changes, if any, I would need to make in order to meet my challenge of no added oil, and using only whole grains.  The recipe as written calls for 2 tablespoons of melted vegan margarine to go in the pancake batter, and oil on the skillet for frying the pancakes.  Adjustments to this seemed easy enough - the batter itself sounded like it would be plenty rich with the mashed banana and soymilk, so I didn't think I would miss the added fat, and I have excellent non-stick skillets, so no need to add oil when cooking the pancakes.  The flour portion of the recipe called for all-purpose flour, meaning white flour, so I substituted whole wheat pastry flour here.

The recipe came together very nicely, and the consistency of the batter was perfect, even with the changes described above.  With the whole wheat flour, and the addition of cinnamon, allspice, and nutmeg, the batter reminded me of buckwheat pancakes.  And the finished product actually was sort of pleasantly nutty and only slightly more dense than if white flour had been used.  Both my husband and I thought they were delicious.  We topped them with pure maple syrup, with veggie sausage and fruit salad on the side.

Friday, October 29, 2010

White Bean and Walnut Patties

When I first browsed through this book, I was excited to see several recipes for veggie burgers.  I have been trying to move away from products made from highly processed soy isolates, but I find I am not overly fond of burgers that don't have any chew, and won't hold together.  I was even more excited when I saw that many of the burger recipes here included vital wheat gluten as part of the mixture, which looked to me would add both chew and stick-ability.  So, the second recipe I tried was the "White Bean and Walnut Patties", page 122.  Because the recipe gave the option of baking the patties, I did not have to include the 2 tablespoons of oil required if I chose to fry them.  I baked them on a non-stick cookie sheet lined with parchment paper, so no oil was required here either. 

For some reason, even after following the directions exactly, once I had blended all the ingredients, the mixture was too dry to hold together.  I ended up adding about 4-5 tablespoons water to the blended ingredients to obtain the desired consistency.  Other than that, I did not have to alter any of the ingredients.  I did, however, make six burgers instead of the four suggested.  This is just a matter of personal taste, as I prefer my burgers a little thinner and flatter than most recipes suggest.

These burgers were so good!  They stuck together!  They had chew!  They had outstanding flavor!  The sage added a depth of flavor I especially enjoyed. The recipe suggests serving these burgers on sandwich bread with mustard, lettuce, and sliced tomatoes.  Which is what I did the next day - the first day, I served them as an entrée with mashed potatoes, gravy, and green beans.  I liked them both ways, but thought they were especially good served as part of a hot entrée.

Thursday, October 28, 2010

Breakfast Bulgur with Pears and Peacans

Whole grain hot cereal is one of my breakfast mainstays and I am always looking for new ways to prepare and combine grains with complementary fruits, nuts, and flavorings.  The "Breakfast Bulgur with Pears and Pecans" (page 522) caught my eye this week since we had extra pears around that were getting ripe and needed to be eaten.  The ingredients were simple, basically just the grain, diced pears, and chopped pecans, and the preparation fast, something I especially appreciate in a weekday breakfast.  Although the recipe called for the bulgur to be cooked on the stove top, I usually just "soak" my bulgur by adding equal parts boiling water to grain in a bowl, covering, and letting sit for about 20-25 minutes.  This doesn’t save time, but it is easier, as it doesn't have to be stirred or tended to.  While the bulgur soaks, I finish the rest of the meal preparation.

The recipe called for adding margarine to the cooked bulgur along with the pears and pecans, but I omitted this step. When putting all the ingredients together, I kept thinking a little vanilla extract would be a nice addition, so I added ¼ teaspoon to the mix.  Oh yes, this was a good choice!  There are no suggestions as to what to top the cooked cereal with, but any of the regular choices work well here, such as brown sugar or maple syrup and non-dairy milk.  I added a sprinkle of cinnamon and a splash of soy milk to mine, and it was delicious.  The pears added enough flavor and were plenty sweet without adding other sweeteners.

This recipe is easy, hearty, very tasty, and a wonderful dish to make in the Autumn when pears are at their peak.

Wednesday, October 27, 2010

Curried Butternut and Red Lentil Soup with Chard

 I love soup!  Soup everyday would not hurt my feelings.  This book offers up no less than 85 soup recipes, from light broths, to creamy purees, heartier fare, and cold soup selections.  With the markets overflowing with winter squashes right now, I picked up a butternut squash to try the "Curried Butternut and Red Lentil Soup with Chard" (p. 165).  Everything in this recipe looked good to me, beginning with the red lentils which cook down to a thick and creamy consistency; the rich and sweet flavor of butternut squash; fresh greens; and just a touch of curry.  I wasn't disappointed.  This soup was everything I thought it would be.  The ingredients list was not too long, and preparation was a breeze.  Did I mention delicious?  Very!

Keeping with my quest to omit the oil when preparing these recipes, I left out the one tablespoon olive oil listed for sautéing the onion.  Instead, I sautéed the onions in a dry cast iron soup pot until they started to brown, then added a little water to bring up the browning. This was the only adjustment I needed to make to this recipe to maintain my goal of "no oil" and "all whole grain".  Unfortunately, the market where I shopped had no fresh chard available, so I substituted spinach instead.  This worked very well.  I just stirred a bag of baby spinach into the soup once it was done, turned off the heat, and let everything sit for about an hour.

Most soup recipes call for garlic to be added at the beginning of the cooking time, as this one did, but I almost always hold off adding it until the soup is completely cooked.  At that point, I stir the garlic into the finished soup, just after turning off the heat, as this cooks the garlic just enough to take the edge off, but not so much that the flavor becomes lost in the pot.  I followed this procedure for this recipe and also added about ¼ cup chopped cilantro at the same time (my addition).  A great soup!  I'm already looking forward to the leftovers.

Tuesday, October 26, 2010

Black Bean and Bulgur Loaf

 One of my favorite non-vegan foods in my past life was meatloaf, and one of my goals is to find or create a vegan recipe that will capture the flavors and texture of a traditional meatloaf.  I've been able to come pretty close using Gimme Lean and other soy based products, but I am also trying to move away from processed soy.  I've tried lots of veggie loaf recipes utilizing lentils, brown rice, beans, oats, etc, and have not been pleased with the outcome.  I think this is just me.  Since I have my mind set on a "Neat Loaf" that tastes like a "Meat Loaf", it's going to be hard to accomplish this using grains and beans.

However, I was excited when I saw a few veggie loaf recipes in this book, as they incorporate vital wheat gluten flour, which I thought would give the loaf better chew (texture), and help everything stick together better.  So, it was with high hopes I tried the "Black Bean and Bulgur Loaf" (p. 264).  The recipe went together as written, and wasn't complicated to follow.  The final mixture seemed to be the right consistency - not too dry, not too moist.  It baked in the allotted amount of time.  I let it cool for 15 minutes (recipe says wait 10 minutes), and it turned out of the pan just fine, staying in one piece.  So far, so good.

But alas, this was still a bean and grain loaf.  Not a bad thing if that is what you had in mind, but I think my expectations were off.  I found it to be just a tad bland, but the addition of Basic Brown Sauce (see review below) took care of that, as any favorite topping could have.  It didn't hold together quite as well as I thought it would with the addition of the vital wheat gluten, but it didn't totally crumble apart like some veggie loaves are prone to do.

The recipe called for 1 tablespoon olive oil for sautéing the onion, but I omitted this and dry fried the onion in a non-stick pan.  It also called for oiling the loaf pan, but I used a silicone loaf pan which requires no oiling at all.  Both these changes worked out well and I was able to stick to my "no oil" rule.  The rest of the ingredients were used as listed, with no substitutions required.

Monday, October 25, 2010

Basic Brown Sauce

I decided to make the "Basic Brown Sauce" (p. 545) as it was suggested as a topping for the Black Bean and Bulgur Loaf (see review above).  I was thinking this would be like gravy, and I could use it to top not only the loaf, but mashed potatoes as well.  It is actually better than gravy!  It is basically a broth flavored with fresh vegetables, wine, herbs, and spices, thickened with flour, cooked on the stove top to blend and deepen the flavors, then pureed in a blender. What a dynamite combination of flavors!  And it came to me that this was really like a white sauce, only brown.  Duh!  Basic Brown Sauce is the name of the recipe, right?  I think this sauce would be good on all kinds of things, such as potatoes, rice, veggie burgers, biscuits, and anywhere else you would use gravy.

The recipe did call for 2 tablespoons of olive oil, which seemed to me would add a dimension and richness to the overall sauce.  I thought I would use an equal amount of tahini instead of the oil, and no sooner did I make my mind up to do just that, than I saw this suggested in a side bar to the recipe.  Because of the way the flour was supposed to be incorporated into the oil, I had to rearrange the way everything came together since I used tahini instead.  This caused no problems.  The recipe also called for all-purpose flour (white), but I used whole wheat pastry flour in place of that.  So, I was able to stick to both my criteria - no oil and only whole grain products.

Sunday, October 24, 2010

Pumpkin Bread with Cranberries

This year for the first time I baked a pumpkin from scratch.  I never saw any reason to do this before as it was so easy to get canned pumpkin in the store, especially when the only ingredient listed on the label is "Pumpkin".  How much more pure can you get?  But for whatever reason in Northern Michigan, where we were staying for five months, the area was suffering from a canned pumpkin shortage.  Couldn't find a can anywhere!  But when the fresh pumpkin harvest came around, there were pumpkins everywhere!  I finally decided I could deal with baking a pumpkin, scraping the flesh out, and pureeing it in a food processor.  I bought a medium sized pumpkin from the Girl Scouts, and ended up with 5 cups of puree.

Today I used one cup of the puree to make "Pumpkin Bread with Cranberries" (p. 402).  A very festive sounding loaf, and very timely, with Halloween just behind us, and Thanksgiving only three weeks away.  After reading through the recipe, I figured out what changes I needed to make to omit any added oil, and keep to using just whole grains.  For awhile now I've been using mashed banana, applesauce, or pureed prunes to replace the fat content in baked goods such as cookies and quick breads.  For this recipe I decided on applesauce, since I had the snack size containers on hand, and I thought the apple flavor would complement the pumpkin, cranberry, and spices (cinnamon, allspice, ginger, and nutmeg).  Instead of all purpose flour (white), I used whole wheat pastry flour.

The recipe mixed up just right.  The baking time of one hour was perfect.  I used my silicone loaf pan, so I didn't need to use any oil there.  The loaf came out of the pan easily after 15 minutes of cool down time.  The first slices my husband and I tried were still warm out of the oven, and just perfect with a cup of tea! Sweet, moist, and delicate.  We had seconds after it had completely cooled, and it still tasted wonderful.  The "roof" on this loaf seemed to have lifted during the baking, and when slicing it, I had to be careful, but this did not detract whatsoever from my enjoyment of it.  I do wonder, though, if this same thing would have happened if I'd used white flour and oil?  But even if that's the case, I'm glad I kept to my challenge, and I have no complaints about this lovely loaf.

Saturday, October 23, 2010

Penne with Vodka-Spiked Tomato Sauce

The first recipe I tried from the Pasta and Noodles chapter was "Penne with Vodka-Spiked Tomato Sauce" (p. 198).  My husband is a huge pasta fan, but he really doesn't care for the whole grain variety.  Even the blends of whole wheat flour and white flour aren't his favorite.  So, I thought if I started with a recipe that had a very flavorful sauce, the type of pasta used wouldn't be so prominent.  I ended up selecting the Barilla penne pasta, a blend of whole wheat flour, white flour, and oat bran. This blend is supposed to be 51% whole grain, so I felt it was a fair compromise.

The sauce is very easy to prepare, using canned crushed tomatoes as the base, with the addition of a sautéed onion (I used water, not the oil called for in the recipe) and a little seasoning.  White beans and soy milk are blended together to make it a little richer.  It didn't take long to prepare, but I expected the sauce to be thicker than it was, especially with the addition of the beans.  It just so happened I had a dab of left over tomato paste in the fridge, so I stirred that into the sauce, bringing it to the desired thickness.  Next time, I might use more beans to see if that makes a difference.  I can't say that I really tasted the vodka in the sauce, although the blend of all the flavors was very pleasing, and I probably would have noticed if it wasn't there.

Most recipes call for more pasta than I would prefer for the amount of sauce to go along with it.  I like a little pasta with a lot of sauce, so I usually prepare less pasta than called for. No exception here.  The recipe called for a pound of penne, and I prepared 12 ounces.  Perfect!  Plus, when there are leftovers, it helps to have extra sauce for the pasta to soak up.  I liked this recipe very much!

Friday, October 22, 2010

Basic Pizza Dough

I go back and forth with pizza crust/dough.  Buy pre-made crust, or make dough from scratch?  I would gladly buy a premade crust if I could find one that was whole grain and oil free.  I'm over having to have a soft doughy crust on my pizza.  I don't mind 100% whole grain anything.  So, it seems my options have been narrowed down to making my own, unless I'm lucky enough to stumble onto something as I travel around and visit health food stores and food co-ops, or the occasional local (and rare) whole grains bakery.

Speaking of traveling around, in case you haven't read my profile, I live and travel full time with my husband in a 5th wheel trailer.  The oven in our rig does not handle a 12" round pizza pan (the oven door won't close with a pan this size inside).  I need an 11" or maybe even a 10" round pan, but so far I've only seen 12" and larger, or very tiny personal pizza sized pans.  I've given up the idea of having to have round pizza and just use my rectangular cookie sheets when I make pizza.  It still tastes the same!

For this recipe, I decided to use whole wheat pastry flour instead of all-purpose (white), and not to oil the bowl where I put the dough to rise.  Up until this point, that was the only adjustment necessary to keep to my no-oil, whole-grain-only quest.  I found it interesting that the instructions did not include any kneading, indeed, even had instructions not to over mix the dough.  In my past experience with yeasted dough, the more kneading, the better.  But this seemed to work out okay, even using the whole grain flour.  At the end of the one hour rising time, the dough hadn't grown all that much, but I went forward with the rest of the rolling out instructions found in the actual pizza recipe, and everything worked out just fine. 

This was actually the first time I used whole wheat pastry flour for a pizza crust, and I was pleased with the results.  I'm stopping with just the "Basic Pizza Dough" (p. 128) in this post, as I want to list each of the 1000 recipes individually.  (To see how I topped it, see the post below.)

Thursday, October 21, 2010

EBAP (Everything But Animal Products) Pizza

Once you get the Basic Pizza Dough prepared (see post above), you are instructed to proceed to the topping recipe of your choice.  I decided to try the "EBAP (Everything But Animal Products) Pizza" (p.130) first.  The recipe has you roll out the prepared dough, spread it over a 12" round pizza pan, and spread one tablespoon of oil over the top of the dough.  Since my oven can't handle that size pan, I used two rectangular cookie sheets.  I could probably have just used one cookie sheet, but I prefer a thinner crust, and the recipe provided enough dough to cover two.  I omitted the oil altogether.

The rest of the recipe consists of adding a layer of pizza sauce, and the EBAP toppings of your choice.  For our pizza I chose mushrooms, onions, bell peppers (all three sautéed first), olives, and artichoke hearts. I had a package of vegan mozzarella style cheese I wanted to try, so I added this as well.  I'm wishing now I had left it off, or at least used a little less.  The flavor and texture seemed to dominate the other ingredients, but I didn't realize this would happen since I had not used this cheese before. Also, the baking time of 12 minutes wasn't long enough, and I had to put the pizza back in for another 15 minutes.  Maybe my oven?  But I like my pizza very hot and the crust crispy so could just be me. 

Other than that, this was a good veggie pizza, food I never seem to tire of.  I had chopped fresh tomatoes, red pepper flakes, and vegan parmesan sprinkles to add at the table.  I rounded out the meal with a tossed green salad.  Good Saturday night eats! 

Wednesday, October 20, 2010

Soy-Tan Dream Cutlets

The "Soy-Tan Dream Cutlets" (p. 294) caught my eye almost immediately the first time I started browsing through this book.  Robertson describes them as a vegan cutlet that's not too chewy, and not too soft - just right, and something that has long been a dream of hers.  Mine too!  I love the way many of her recipes combine the vital wheat gluten for the chew with softer ingredients such as tofu and/or beans and/or grains to add a bit of tenderness.  These cutlets basically consisted of tofu, vital wheat gluten, and seasoning, blended together, rolled out very thin, and pan fried.  The recipe instructs you to fry the cutlets in two tablespoons of oil.  I admit, I was tempted to add just a little bit of oil to my nonstick skillet, not because I was worried the cutlets would stick, but because I thought it might put a nice crispy coating on them.  But, I was steadfast to my challenge, and I'm really glad I was!  They browned up nicely, despite no added oil, and since I topped them with left over "Basic Brown Sauce" (see review above), it seemed less important to have any kind of crispy coating on them.

These cutlets tasted wonderful! They were spiced perfectly with garlic, onion, pepper, and paprika.  These cutlets were chewy!  I think for my tastes, even a little chewier than I would prefer, so I think next time I make them, I will use less vital wheat gluten and see what happens.  And I will make them again!  I think Ms. Robertson is definitely on to something using the gluten to create chewy and substantial meat substitutes, and avoiding the soy isolates so prominent in most commercial faux meats.

Tuesday, October 19, 2010

Vegan Mayonnaise

It took me quite a long time to get over my love affair with commercial egg and oil laden mayonnaise.  And I know if I were to put Kraft or Hellman's back into my fridge, I would still enjoy it.  But I also know this is not in my best interest, so over the years I have experimented with lots of vegan, oil free mayos, both store bought, and homemade, in an attempt to find an all purpose spread that works on sandwiches, in sauces, dressings, and salads.  Eventually I settled on a silken tofu based recipe, and it has served me well for quite some time.

However, I'm always open to new ideas! I saw the recipe for "Vegan Mayonnaise" (page 573) as a suggested dressing for the "Creamy Coleslaw" which I plan to make later today, so I figured I'd give it a whirl.  The ingredients in this recipe make it quite similar to the recipe I have been using up until now.  There are a couple of differences, such as using apple cider vinegar instead of lemon juice, and adding Dijon mustard.  But the most significant difference, and the one that I think makes this a superior mayo, is the addition of cayenne pepper.  That, along with the Dijon and apple cider vinegar, give this vegan mayonnaise the perfect zing - not too hot, but enough to wake your taste buds up just a little. 

I did not have to make any adjustments to this recipe to keep it McDougall Plan friendly. This might become my new favorite mayo!

Monday, October 18, 2010

Creamy Coleslaw

When it comes to coleslaw, I prefer creamy over tart.  The "Creamy Coleslaw" (page 72) looked like it fit the bill, so I made a batch to go with tonight's dinner of Maple Baked Beans (review to come soon) and grilled yams.  The recipe consists of sliced cabbage, grated carrot, and some seasoning, mixed with a creamy mayo dressing.  For the base of the dressing I used the "Vegan Mayonnaise" from this book (see review above), which was suggested in the coleslaw recipe.

Because this particular mayo already has two tablespoons of apple cider vinegar in it, and as I mentioned, I prefer creamy to tart, I omitted the additional apple cider vinegar called for in the dressing recipe itself.  You would probably want to leave it in if you prefer a sharper flavor. In my opinion, coleslaw gets better after it sits for a few hours, so I made it early in the day to be perfect by dinner.  But of course, I had to try a sample right away, and it was totally delicious without sitting for even five minutes! The zesty mayo is really the perfect dressing for this simple coleslaw, and I can't imagine using anything else now that I've found it.

This recipe was another that was completely McDougall Plan friendly without making any changes.

Sunday, October 17, 2010

Maple Baked Beans

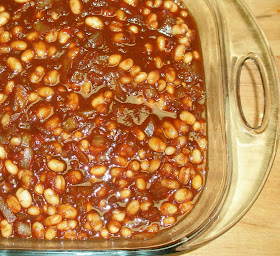
The "Maple Baked Beans" (page 257) are delightful!  There are a couple things going for these beans - they are easy to put together (especially if you use canned beans), and they don't have to cook all day, even though they taste like they did.  I admit, I was a little concerned that with both maple syrup and blackstrap molasses, they would end up being too sweet, but this wasn't the case at all.  Combining the sweeteners with the tanginess and hot from the mustard powder and cayenne yielded a wonderfully perfect blend of flavors.  It seems like it would be easy to double this recipe if you wanted an easy and tasty potluck dish. I'm sure everyone would be asking you for the recipe.

The only change required to make this McDougall friendly was to omit the oil when sautéing the onions.  Another change I made, and this is just personal preference, was adding the garlic just before popping the beans into the oven, rather than sautéing them with the onions at the beginning of the recipe.  I often add garlic towards the end of a dish so the flavor remains intact.

Saturday, October 16, 2010

Maple-Walnut Oatmeal Cookies

If you have already experimented with baking fat-free cookies, you probably know that it is difficult, if not impossible, to produce a crispy cookie once you remove the oil, butter, or margarine from the recipe.  In my experience, unless there is peanut butter in the cookie dough, which adds a little fat, most recipe conversions yield a very tasty, but very soft and cake-like cookie.  This isn't bad.  Not at all!  But, if you have your heart set on a crispy cookie, this might not be the place to look.  If, on the other hand, you are looking for a way to have your dessert and eat it oil-free, you are in the right place!

My husband requested I try the "Maple-Walnut Oatmeal Cookies" (page 431) as my first go at the dessert section in this book.  I saw immediately that I would have to change two of the ingredients to keep this whole-grain and oil-free.  For the all-purpose (white) flour, I used whole wheat pastry flour.  I used a combination of baby food prunes and apple sauce, to equal the ½ cup margarine called for.  Because I used no oil in the dough, I lined my cookie sheets with parchment paper to prevent sticking. Because I used whole wheat flour and prune puree, the cookies are probably a bit darker than they would have been if prepared as directed.

As predicted, these cookies came out very soft and moist, only slightly chewy, and oh so delicious!  I included the optional dried cranberries since I had them on hand from the Pumpkin Bread with Cranberries (see review above), a pretty and tasty addition.  I decided to do a fat gram comparison between the recipe as written and how I prepared it, using FitDay to do the calculations.  The recipe as written was to yield about 2 dozen cookies, and the fat would come from the margarine and walnuts.  The recipe as I prepared it yielded 3 dozen cookies, and omitted the margarine.  The fat grams, when prepared as written, come to 4.7 grams per cookie.  The fat grams as I prepared this recipe come to 2.2 grams per cookie.  And who can eat just one, anyway?

Friday, October 15, 2010

Tastes Like Tuna Salad Sandwiches

Sandwiches are fun food!  Infinite possibilities and combinations of breads, wraps, fillings, spreads, and condiments can keep you going forever.  I don't think I could ever get tired of sandwiches.  The first sandwich I selected to try from this book was "Tastes Like Tuna Salad Sandwiches" (page 108).  It seems that chick peas (garbanzo beans) have become the vegan substitute for tuna, and I've seen several recipes for 'mock tuna' show up in many places.  This recipe also uses chick peas which you mash up (I used a potato masher) and add diced veggies, mayo, and seasoning to.  It is prepared with the same ingredients one would use to make tuna salad, but with one exception - the recipe calls for kelp powder to give it "a delicate taste of the sea".  I think this is a really good idea if you like the taste of kelp.  I happen not to like that taste, so I chose to omit the kelp.

This makes a very good sandwich spread, especially using the Vegan Mayonnaise from this book (see review above).  There were no modifications necessary to make this McDougall Plan friendly.  Served with a pickle on the side, and you are eating the best of vegan deli fare!

Thursday, October 14, 2010

Spicy Pinto Bean Soup

Pintos are my favorite bean, and I prefer to start with dried beans whenever I can.  My mother would often make a pot of pintos on cold and rainy days, and putting a kettle on in my own home never fails to conjure up pleasant memories from my childhood.  But as an adult, I've come to enjoy a spicier rendition than Mom cooked up, so I was especially drawn to the "Spicy Pinto Bean Soup" (page 161).  I started with a pound of dried pintos, soaked them for about 8 hours before cooking, and planned to use what I needed for the recipe (a total of 4 ½ cups), saving the rest for something else later on.  But as it turned out, I ended up using all of the beans, adjusting the recipe as necessary to incorporate what little extra was left over.  And, I'm not sorry!  This soup shot immediately to the top of my list of "Favorite Ways to Prepare Pinto Beans". 


Because you blend part of the cooked pintos with crushed tomatoes, the base of the soup is very creamy, like adding refried beans to a pot of whole beans.  The spiciness comes from canned chipotle chilies in adobo sauce, and although the recipe called for one teaspoon, I doubled this, as we like our food spicy.  I would test this out first if you aren't familiar with the type of heat provided by chipotles.  They are hot, with a hint of smokiness, but again, they are HOT!  

The recipe calls for four cups of broth or water; I used the left over cooking liquid from the beans for this, adding depth of color and extra flavor to the soup. And, the only change I made to make this recipe McDougall friendly was to "dry fry" the onion instead of sautéing in oil.

Wednesday, October 13, 2010

Spicy Chipotle Potato Quesadillasa

"Spicy Chipotle Potato Quesadillas" (page 32) seemed the perfect accompaniment to the Spicy Pinto Bean Soup" (see review above).  They both use the chipotle chilies in adobo so this gave me another way to start using up the can I opened for the soup.  However, I faced my biggest roadblock thus far trying to keep to the "only whole grain" portion of my challenge, while at the same time keeping it "oil free".  That's because I could not find a tortilla that was both whole grain and oil free.  The tortillas that were (only partially) whole grain had a lot of oil in them.  The fat free tortillas were made with white flour.  I decided that no oil was probably a better choice than whole grain with oil, so I went with the white flour tortillas.  I'm disappointed I had to make this compromise, but I still enjoyed these quesadillas very much.

The ingredients are simple - rough mashed potatoes, onion (which I "dry fried" rather than sautéing in oil), and chipotle, stuffed into a tortilla, and grilled in a skillet.  No oil is required for grilling if you use a non-stick skillet.  I was a little skeptical about how good these would be as I was preparing the filling, since there didn’t seem to be much to this.  But I was very pleasantly surprised!  The texture came out smooth and creamy, with just the right amount of spice from the chipotle to make it interesting.  I made some guacamole to use as a dip, a suggestion from the recipe notes, and this was a great topper.

Since I wasn't using oil to cook the onion and potato, I did add just a tiny bit of soymilk to the mixture, as it seemed the filling might be a little dry otherwise.  My husband and I joked these should be called "papasdillas" (papas meaning 'potato' in Spanish) instead of quesadillas (queso meaning 'cheese'), but we both agreed to call them Delicious!

Tuesday, October 12, 2010

Tortilla Chips

Because I've found a way to make crisp, oil-free tortilla chips (and tostada shells) in the microwave, I haven't pursued baking them in the oven. It seems I remember having tried this in the past, and not getting the same good results I get from the microwave.  But the problem with the microwave is you can only process one tortilla at a time, and each tortilla takes about two minutes.  So, in the spirit of adventure, I decided to try the "Tortilla Chips" (page 5) to see if anything had changed.  The recipe as written calls for the tortilla chips to be brushed with oil, but I omitted this step in order to make them McDougall Plan friendly.

I cut the tortillas into triangles, placed them on cookie sheets (no oil or parchment paper required), and sprinkled some salt free spicy seasoning on top.  I baked the first batch for 12 minutes (the recipe calls for 8-10), and let them rest for several minutes to crisp up, but they were still kind of soft and chewy.  (I remember now - this was the same problem I experienced all those years ago!).  The next batch I left in for 14 minutes, checking often after 10 to make sure they weren't burning (it smelled like they might be), then I turned off the oven and let them sit inside with the door closed for 2 more minutes.  These came out crispy, but kind of dry. 

I'm figuring it's the lack of oil that's causing the chips to be either, too soft and chewy, or too dry.  This may just be the way it is with oil free oven baked chips.  For now, I think I'm going to stick with the microwave method I have devised, even though it takes a lot longer if making more than a few chips.

Monday, October 11, 2010

Tofu Sour Cream

Although I already have a tofu-based recipe I use regularly to make sour cream, I decided to try the "Tofu Sour Cream" (page 574) to see which I liked better.  The recipe in this book calls for oil, and surprisingly (at least to me) for a small amount of tahini.  I'm guessing the tahini adds body and thickness to the sour cream, and just a little extra richness as well. I omitted the oil, but I did include the tahini.  The "sour" comes from fresh squeezed lemon juice, and adds the perfect amount of tang.  In my own recipes for tofu mayonnaise and sour cream, I usually add about ½ teaspoon guar gum to keep the finished product from separating as it sits.  I decided to forgo the guar in this preparation, as I felt the tahini would provide the same quality.

I have to say, I really notice the flavor of the tahini in this sour cream, even with the small amount called for.  I like tahini, but I'm not sure if I like the flavor of it in sour cream.  I think one could leave  it out altogether, and still end up with a very nice tofu sour cream.  It's probably a matter of personal preference and taste.  Give it a try and see what you think - I'd be very interested in your thoughts!

Sunday, October 10, 2010

Back-to-Basics Hummus

According to Parade Magazine this week, Hummus is the new salsa!  Hummus consumption has increased by 1500% in the past decade!  I know I have certainly done my part to help drive that number up.  I think hummus should be one of the food groups, don't you?  I've tried complicated hummus recipes, with myriad ingredients, and I've also just blended garbanzo beans, lemon juice, and garlic in the food processor and called that hummus.  Everyone seems to have a favorite hummus recipe.  My favorite preparation includes a little tahini, less lemon than most recipes call for, and a lot of garlic.  Of course, I leave out the oil, which I don't even miss, especially with the tahini which adds a little natural oil and helps make the hummus smooth. 

"Back-to-Basics Hummus" (page 10) has the perfect set of ingredients - garbanzo beans, garlic, tahini, lemon, and a touch of cayenne for a nice glow.  The recipe also calls for olive oil, but I omitted this to be McDougall compliant.  I am very pleased with this recipe.  The texture, taste, and spiciness level are all spot on!  The only problem is, I didn't double the recipe…  On an aside, the first time I saw the word "hummus", it was listed on a blackboard menu at the natural foods co-op in my town.  They wrote it like this:  Hummus (a tune).  I thought that was the perfect way to let people know how it was pronounced, back when hummus wasn't quite so well known.

Saturday, October 9, 2010

Vegan Matzo Balls

I couldn't wait to try the "Vegan Matzo Balls" (page 151), and the companion soup that they go in (see review below).  I have forever loved matzo ball soup, and depending on the time of year, or where I am currently living, it hasn't always been easy to find the matzo meal, or the matzo ball soup mix, required to make this awesome dish.  So, I was really delighted when I was able to find the matzo meal in the local grocery store in this very small Texas town where I am currently parked.  The recipe in this book makes use of tofu to replace the traditional egg ingredient in these delectable dumplings, and the results were melt-in-the-mouth delicious.  What is it about matzo meal that makes such a delicious matzo ball?  I mean, after all, it's basically just wheat-flour based meal and salt.  Must be some kind of magic!

The recipe gives you the option of either baking the matzo balls ahead of time, then ladling the soup over the top of them, or simmering them in the broth itself.  Ms. Robertson indicated that baking them yielded a slightly chewier result, and that was her preference, so I decided to try it that way for the first go around.  I did have to make some adjustments to the recipe, as it called for ¼ cup of oil.  I replaced that with ¼ cup broth, and the dough was still a little dry, so I ended up adding another 2 tablespoons of broth.  I can't imagine the oil would have made these any more tender or delicious! 

But when it came to keeping this whole grain, I failed.  Up until yesterday, I didn't even realize there were whole wheat versions of matzo meal available.  But I started thinking about it, did a quick search on the Internet, and discovered that yes indeed, there are companies that make a whole wheat version.  I've never seen this in any market so far, but I'm sure if I wanted to I could order this online.  Perhaps next time I will pursue this avenue.

Friday, October 8, 2010

Vegan Matzo Ball Soup

The "Vegan Matzo Ball Soup" (page 150) is a two-part recipe.  The soup, which I am reviewing here, and the matzo balls, which I reviewed above.  While the matzo balls were baking in the oven, I prepared this very simple, but very delicious soup to go with them.  The soup portion is like a heavy broth, or a light soup, however you want to look at it, and depending on what you use for the broth portion probably determines a great deal about how good it will taste in the end.  I used a powdered vegan "chicken" flavored broth made by Frontier Foods which I really like, and it was the perfect choice for this preparation.  The ingredients are simple - broth, onion, carrot, celery, and some spices.  I omitted the oil called for to sauté the onions, and that was the only change required to keep it on plan.

I placed the baked matzo balls in a bowl, ladled the soup over them, and enjoyed one of the most warming, comforting soups I've had for a long time!  I can see myself making this recipe quite often, especially over the winter months.

Thursday, October 7, 2010

Cucumber Raita

"Cucumber Raita" (page 575) is an easy dish to put together if you are lucky enough to have access to vegan yogurt. At the moment, I am not, but I did make the Tofu Sour Cream (see review above) earlier in the week, and thought this would be a good stand-in for the yogurt.  Turns out I was right!  The sour cream worked perfectly in this dish, and no other changes were required to make this recipe McDougall friendly.  I did, however, add some minced fresh garlic, as there is just something so wonderful and maybe even addictive in the combination of sour cream, garlic, and cucumbers.  This is a simple and tasty dish that can be served as is, on top of a salad greens, or tucked into a pita along with some hummus, tomato, and lettuce.

Wednesday, October 6, 2010

Chipotle-Painted Baked Tofu

If you find yourself trying to figure out what to do with left over chipotle chilies after you open up a can and only use one or two, look no further than "Chipotle-Painted Baked Tofu" (page 288).  This recipe is deceptively simple, just a matter of blending the chipotle with some soy sauce, brushing it on some sliced tofu, and popping it in the oven for a bit. The ingredients as written do include oil, but I just left that completely out, not even bothering to increase the other liquids, or try to replace it with anything.  And, because I once again thought this combination was begging for garlic, I minced up a clove and threw that in as well.

I did have a little trouble blending the mixture to a smooth puree, and I don't know for sure if that is the intention.  You can see from my picture that there were still pieces of the chili that did not break down.  In any case, this did not detract from the end result in the least. The chipotle adds the perfect amount of heat, a nice glow that doesn't overwhelm.  I baked the tofu slices double the amount of time called for (40 minutes versus 20) because I wanted a chewier strip, but that is probably a matter of personal preference.  After the tofu strips baked and cooled down, I made a sandwich out of them with lettuce, tomato, and vegan mayo on lightly toasted whole wheat bread.  Better than a BLT!